UG: Alarm (Rev #10, changes)
Showing changes from revision #9 to #10:
Added | Removed | Changed
This chapter describes version 2.86 2.90 (17-Jun-2012) (08-May-2016)
 or
or 
Setting the date and time and date
(changed heading) heading and content)
You can set the time and date in the computer either manually or, if it is connected to the internet, automatically from an internet time server. In either case can you make use of the the Configure plug-in described on page (ref) in the chapter Changing the computer’s configuration. Alternatively, you can open the same Time and date setup dialogue from Alarm’s icon bar menu item Set clock…:

To set the date and time click Menu over the time display on the icon bar. In the resulting menu select Set clock… to bring up the Time and date window:

The date and time can be set manually or, if your computer is connected to the internet, automatically from an internet time server.
Setting date and time manually
To set the date and timemanually click the Set manually button at the top of the window. This enables the input fields just below the button. The first is for the date which is selected from the calendar displayed when the menu icon on the right is clicked. Use the arrows to move between the years and months, and then click on the desired day.
The time is set in a similar manner in the fields below using the arrows to alter the hours and minutes.
The new date and time apply to the entire system, not just to Alarm.
Setting date and time automatically
If the computer is connected to the internet a more suitable method of setting the date and time is to use a time server. One advantage of doing this is that you can specify how often your system will check and, if necessary correct, the time. Although your system will maintain the time fairly accurately it will probably drift, and this method ensures it is kept accurate.
You can either specify a time server whose address you know, or let the system select one for you. You can then specify how often the system is to check for accuracy.
Locality and daylight saving time
Ensure that Locality is chosen to suit your time zone. The menu icon displays the range of possibilties to chose from. The image above shows Coordinated Universal Time (UTC) is being specified, which is correct for the UK.
The option Switch DST automatically ensures that the computer’s time is corrected at each clock change to and from Daylight Saving Time (known in the UK as BST or British Summer Time).
Finally click on Set to set the clock to the new date and time.
Setting an alarm
This To section define shows you how to set an alarm alarm, using click on the time display on the icon bar to open theSet alarm dialogue dialogue: box which is opened by clicking on the time display on the iconbar.

To Choose set the an date alarm: and time of the alarm by clicking on the arrows above and below the date and time boxes. It is also possible to type the required date and time directly into the boxes — except for the month.
- Set the date and time by clicking on the arrows each side of the date and time boxes. It is also possible to type the required date and time directly into the boxes — except for the month.
- In the Message box, type the text that you want displayed when the alarm goes off.
- Click on Save to save the alarm settings and set the alarm.
- In the Message box, type the text that you want displayed when the alarm goes off.
- Click on Save to define the alarm, and click Accept in the confirmation dialogue that opens:
When an alarm is set the border of Alarm’s icon on the icon bar changes colour from blue to red and yellow: or
or 
If you have set Automatically update Alarm database in the Alarm choices dialogue described below, that is it. If not, see below Saving alarms.
When an alarm is set, the border of Alarm’s icon on the icon bar changes colour:
 or
or 
Urgent
(next 3 paragraphs reordered)
You can mark an alarm as urgent by clicking on the Urgent box. It will then sound an audible alarm when it goes off, even if you have selected the Alarms are silent unless urgent option (see Configuring the Alarm choices).
Mon — Fri (‘Working week’ renamed)
(replace in text) ‘Alarm Setup window’ by ‘Alarm Choices window’
(replace in text) ‘Repeating’ by ‘Recurring’ (two occurrences)
Task alarm
(no (replace changes) in text) Task alarm by Task
Working Urgent week
(no changes)You can mark an alarm as urgent by clicking on the Urgent box. It will then sound an audible alarm when it goes off.
Recurring alarm(‘Repeating alarm’ renamed)
You can set an alarm to go off more than once by switching on theRecurring alarm option option. on. Doing this displays some extra further options:

Choose Use when the radio buttons and arrow icons to specify whether you want the alarm to recur. recur Some by examples calendar are: definition a (as set in time every week, a time on the second example Thursday above), of every month (above), or perhaps by just a an pattern annual definition reminder (as (below). in the example below):

Use To limit the radio current buttons alarm to the working week, click Calendar Mon — Fri . and To limitPatternall your alarms to the working week by default, choose between setting dates and setting intervals and the up and down arrows to set the values.Recurring alarms option in the Alarm Choices dialogue.
With You Calendar chosen, you can set define the more the than one alarm for by simply repeating the first, Set second, alarm third, procedure. last, penultimate or third to last day of the week of the selected month interval.
On saving, you confirm a recurring alarm by clicking Accept in this dialogue:
Saving alarms

To limit just the current alarm to the working week, click on the 
Mon – Fri box.
You can set more than one alarm by simply repeating the Set alarm procedure.
When an alarm goes off
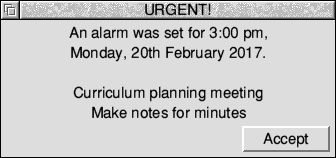
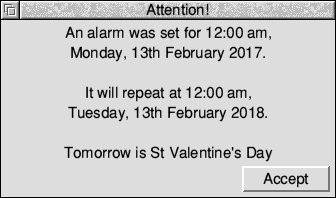
When the alarm time is reached, a window similar to the one ones below appears on the screen:

(replace this sentence only:)
If it is not a recurring repeating alarm, cancel the alarm and remove the window by clicking onAccept or click Menu on the window and choose Accept alarm.
Configuring the Alarm choices
The Choices dialogue allows you to configure:
- how alarms are acted upon
- how the alarm database is used
- the alarm display format
- GMT (Greenwich Mean Time) and BST (British Summer Time) time zone switching.
If your computer is locked (password protected) you won’t be able to change any Alarm Choices until it is unlocked.
To change the Alarm choices:
- Click Menu over the Alarm icon on the icon bar.
- Select Choices…
- Change the options to suit your needs.
- Click Set to save the options.

(no changes to following seven paragraphs)
Alarms are silent unless urgent
Repeating alarms fit into a working weekDELETE
Continuous beep
Turn beep off after
Automatically update the alarm database
Confirm alarm deletions
Display format
(then)
Typing in your own formats
(no change to examples)
For information on how to set up your own formats, see Time and date display formats. The format you specify will also be saved when the Set button is clicked.
Switch between GMT and BST automatically
(delete this paragraph)
Browsing through your alarms
(no (minimum of changes)
(in first paragraph replace_*Alarms*_by Alarms… )
(delete paragraph within Change alarm that describes Previous alarm, Next alarm, Find alarm)
(replace bullet point Save as alarm with:)
(in paragraph Save as alarms is the Note about the use of $.Public still valid?)

Saving Alarm configuration features
(replace section Saving Alarm configuration features by)
h2. Alarm configuration
(rewrite this section)The settings you have chosen when configuring the Alarm setup options described above are stored in the string value of system variable Alarm$Options. This specifies values for keywords -timeout, -weekwork and -format, The default is:
The options chosen are stored in the string value of system variable Alarm$Options. For example, your choices might be encoded like this:
Set Alarm$Options -format "%z12:%mi:%%se %pm. %zdy/%zmn/%yr"
Set Alarm$Options -format "%w3 %zdy %m3 %24:%mi"
The choices shown above, in Configuring the Alarm setup options, would be encoded as:
Set Alarm$Options -timeout 10 -weekwork 62 -format "%w3 %zdy %m3 %24:%mi"
(are these okay, or do they need more double quotes and/or escaped double quotes?)
Time and date display formats
(additional variables in format string:)
| Name | Value | Example |
|---|---|---|
| ~AH | analogue hours display | ~AN |
| ~AM | analogue minutes display | ~AM |
| ~AS | analogue seconds display | ~AS |
| ~IN | alternating :/. indicator | ~IN |
(end of chapter)
